As they say, the bread makes the sandwich. Or maybe I just say that. Either way, these sub rolls are going to take your homemade sandwiches to the next level. I’ve made them every week of my life for over five years. They’re super soft, super fluffy, and easy (really, I promise) to make. If you’re brand new to bread baking, I’ll walk you through each step. Shall we?

If you’ve never made bread, this is a good place to start. Like all yeast breads, it’s a simple process. Knead, rise, shape, rise, bake. Easy, right?
A few things to keep in mind: use common sense. If your dough is super wet and sticky, add some more flour. Let the pictures guide you so you know what it should look like. Don’t overthink shaping the rolls.
Ingredients and Tools You’ll Need
A stand mixer is not strictly necessary, and you can knead by hand. I personally hate this, but it’s doable. It will take at least 15 minutes, and you’ll need to keep going until you see those “windows”. However, you do need metal baking sheets, not glass or ceramic.

Equipment
- Stand mixer or bread machine
- large bowl (for first rise)
- kitchen scale (optional)
- Plastic wrap or a damp cloth (to cover the dough while rising)
- 2 rimmed metal baking sheets (This is essential for creating steam, definitely no glass or ceramic pans, which can shatter when the water hits the hot pan.)
- Parchment paper
- Pastry brush
- cooling rack
Ingredients
- 3 ½ cups bread flour (This creates chewier rolls with better structure than all-purpose flour. In a pinch, all-purpose works, but the texture won’t be quite the same.)
- 1 ¼ cups water
- 3 tablespoons sugar
- 2 ½ teaspoons instant yeast (Mixes right into your dough, rises without trouble, no proofing first.)
- 1½ teaspoons salt
- ¼ cup vegetable oil
How to Make Italian Sub Rolls
If you live at a high altitude, everything’s a little different. The biggest change is that the dough rises fast! Watching your dough and maybe using less yeast or cutting down on rise time can help. Here’s a high-altitude baking guide from King Arthur Baking for more advice on adjusting recipes for altitude.
Step One: Knead The Dough
Add all ingredients to a stand mixer fitted with a dough hook, a bread machine, or a large mixing bowl if kneading by hand. Then, knead until the dough is smooth and stretchy, about 8-10 minutes. To see if it’s kneaded enough, try the “windowpane test”: stretch a small piece of dough thin enough to let some light through without it breaking. The dough should be smooth and slightly sticky to the touch, but it should clear the sides and bottom of the bowl. If using a bread machine, allow the kneading cycle to finish.

Step Two: First Rise
Place the dough in a large, lightly oiled bowl and cover it with a damp cloth or plastic wrap. Let it rise in a warm place for 1 hour, or until it has doubled in size and is very puffy.

Step Three: Rest
After the first rise, gently deflate the dough and divide it into 8 equal pieces. For best results, use a kitchen scale to make sure you get even portions. Loosely shape each piece into a log. Then, cover the logs with plastic wrap and let them rest at room temperature for about 10 minutes. This rest period will make the dough easier to shape.

Step Four: Shape
Prepare a baking sheet by lining it with parchment paper and dusting it with cornmeal. To shape the rolls, gently stretch each log into an oval roll. Pull down the bottoms of the dough to smooth out the tops and pinch the ends underneath to create a smooth, seam-free surface. Place the shaped rolls on the prepared baking sheet, leaving enough space between them for the second rise.
Do not get hysterical about this. Maybe they won’t look perfect and that’s okay. They’ll still be rolls in the end and next time they’ll look even better.
Step Five: Second Rise
Brush the tops of the rolls with melted butter using a pastry brush. Cover them with heavily greased plastic wrap to prevent sticking and allow them to rise in a warm place for about 45 minutes, or until very puffy.

Towards the end of the rising time, preheat your oven to 425°F. Place a rimmed metal baking sheet on a lower rack in the oven to preheat as well. (It must be metal!)
Step Six: Bake With Steam
When the oven is hot, pour 1 cup of water onto the preheated metal baking sheet to create steam.

I know it seems scary to be pouring things into a hot oven, but don’t skip it. Immediately place the rolls on the middle rack of the oven. Bake for 15-19 minutes, or until the rolls are golden brown and sound hollow when tapped on the bottom.
Step Seven: Cool And Serve
Remove the rolls from the oven and cool on a wire rack. Let them cool completely before slicing for sandwiches.
Storing Homemade Sub Rolls
Once your rolls have cooled completely, store them in an airtight container or a zip-top bag at room temperature. They’ll stay just fine for about 2 days.
To make ahead, you can cover the dough after the first rise and place it in the refrigerator overnight. Let it come to room temperature the next day, shape the rolls, and allow them to rise a second time before baking.
These rolls freeze very well. Once they’re completely cooled, put them in a freezer-safe bag or wrap them in plastic wrap. Then, put them in a freezer bag. They’ll stay fresh in the freezer for up to 3 months.
When you’re ready to use the rolls, take them out of the freezer and just let them thaw at room temperature, which usually takes a couple of hours. You can rewarm them, but for a sandwich, room temperature is just fine.
Questions and Troubleshooting
There are a couple of possibilities. Old yeast and a cold room are the most common. Next time, let the dough rise in a warmer spot, like a turned-off but slightly warm oven.
Eh, not really. It does look lovely and helps prevent sticking. If you don’t have any, use parchment paper alone or sprinkle a little flour.
Don’t overthink this. Just shape it into an oval with seams at the bottom. After you do it yourself a few times, you’ll see there’s no real wrong way to do it.
They should be golden brown and feel light for their size. But if you aren’t sure, it’s better to let them bake a minute or two longer than to take them out too early.
You’ll want to look for a gluten-free bread recipe for best results. It’s not my specialty, sorry.
Make It Your Own
This is a basic dough you can customize.
- Brush with olive oil instead of butter before baking
- Top with sesame or poppy seeds
- Add garlic and parmesan
- Add dried herbs to the dough – oregano or basil are both good!
- Shape into shorter rolls for slider buns or longer loaves for hoagies
- Try semolina instead of cornmeal on the bottom

More rolls we love
- Old fashioned soft and buttery yeast rolls are perfect for the holidays.
- These no-knead dinner rolls are super easy (but they do need a long time to rise).
- Bread machine sandwich rolls can be made on the weekend for fresh sandwiches throughout the week.
- I love making these brioche burger buns for burger night.
- A bread machine is an easy way to make dinner rolls.
Printable Recipe
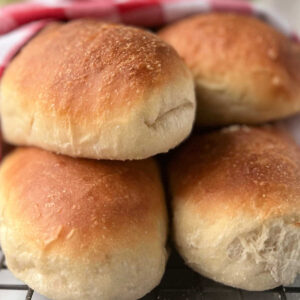
Soft Italian Sub Rolls
Equipment
- Stand mixer or bread machine
- large bowl (for first rise)
- kitchen scale (optional)
- Plastic wrap or a damp cloth (to cover the dough while rising)
- 2 rimmed metal baking sheets
- Pastry brush
- cooling rack
Ingredients
- 3 ½ cups bread flour
- 1 ¼ cups water
- 3 tablespoons sugar
- 2 ½ teaspoons instant yeast
- 1½ teaspoon salt
- ¼ cup vegetable oil
Save This Recipe
You'll join my email list which you will love. And if you don't, unsubscribe in one click. ❤️
Instructions
- Knead the dough. Add all ingredients to a stand mixer fitted with a dough hook, a bread machine, or a large mixing bowl if kneading by hand. Then, knead until the dough is smooth and stretchy, about 8-10 minutes. To see if it's kneaded enough, try the "windowpane test": stretch a small piece of dough thin enough to let some light through without it breaking. The dough should be smooth and slightly sticky to the touch but should clear the sides and bottom of the bowl. If using a bread machine, allow the kneading cycle to finish.
- First rise. Place the dough in a lightly oiled large bowl and cover with a damp cloth or plastic wrap. Let it rise in a warm place for 1 hour, or until it has doubled in size and is very puffy.
- Rest. After the first rise, gently deflate the dough and divide it into 8 equal pieces. For best results, use a kitchen scale to make sure you get even portions. Loosely shape each piece into a log. Then, cover the logs with plastic wrap and let them rest at room temperature for about 10 minutes. This rest period will make the dough easier to shape.
- Shape. Prepare a baking sheet by lining it with parchment paper and dusting it with cornmeal. To shape the rolls, gently stretch each log into an oval roll. Pull down the bottoms of the dough to smooth out the tops and pinch the ends underneath to create a smooth, seam-free surface. Place the shaped rolls on the prepared baking sheet, leaving enough space between them for the second rise.
- Second rise. Brush the tops of the rolls with melted butter using a pastry brush. Cover them with heavily greased plastic wrap to prevent sticking and allow them to rise in a warm place for about 45 minutes, or until very puffy. Towards the end of the rising time, preheat your oven to 425°F. Place a rimmed metal baking sheet on a lower rack in the oven to preheat as well.
- Bake with steam. When the oven is hot, pour 1 cup of water onto the preheated metal baking sheet to create steam. Immediately place the rolls on the middle rack of the oven. Bake for 15-19 minutes, or until the rolls are golden brown and sound hollow when tapped on the bottom.
- Cool and serve. Remove the rolls from the oven and cool on a wire rack. Let them cool completely before slicing for sandwiches. These rolls are best enjoyed within 2 days or can be frozen for later use.
Video
Notes
Nutrition


The softest rolls I have ever made! So simple to make as well.. the longest thing is the ride time but it’s well worth it!!
I’m wanting to make these but a bit confused. I add everything altogether at once? No need to put instant yeast in water first? Your recipe doesn’t say that the water needs to be warm and I’m wondering does it? All the other recipes states, warm water. I want to make these today. Hopefully you can get back with me. And I will be using my hands to need it. Thank you.
you can add the yeast all at once, yes. https://heartscontentfarmhouse.com/activating-yeast/ If you prefer to mix it with warm water first it doesn’t hurt anything but you don’t need to.
great recipe. easy and delicious l.
These are fantastic, they have a wonderful crust and nice chew! The bonus was quick and easy as well.
Are you able to use olive oil in place of vegetable oil?
yes!
This is the best I’ve ever made. Definitely a keeper♥️
These are so good! Who knew oil instead of butter makes the dough so soft.
This dough is so good. I use it for hamburger buns as well. My family loves it. They don’t want store bought anymore. Thank you for sharing!
Thank you so much for the recipe! They turned out so good. I’ll be making them again soon and many more times!!
hooray! love it! we make these alllllllll the time too
Can’t wait to try this recipe.
If you don’t like to use plastic wrap, the old-fashioned way of a damp tea towel over the top will work.
These are the best sub rolls I made so far. I will keep this recipe. I just have to get better at shaping and the same size. My husband loves homemade bread. He said this was a keeper. Thank you
hi alice! so glad you liked them 🙂 if you want all your rolls the same size, weigh the dough, divide by 8 or 10, and portion out each piece of dough to be that size.
Your recipe states to “Add all ingredients” to start. Typically, yeast is activated by dissolving in liquid and sugar.. Do we not have to do this for this recipe? It’s not very clear. Thanks!
I NEVER proof my yeast. I typically use instant yeast (and specify it in my recipes) which does not require any activation, but even with regular active dry you don’t have to. If you would prefer to, you certainly can. Some people like to activate it because it makes sure the yeast is still good. But honestly it’s not needed.
This recipe is so versatile, we’ve made the regular rolls with it, and I’ve done them as pretzel bites too. I’m trying it with cheese added in the dough, we’ll see how they turn out.
awesome karmen!! let me know how it turns out. 🙂
hello! could you please start including grams of flour, etc. for your recipes? thank you for your time.
Do you pour the water on the same panad the bread rolls or in a separate pan?
separate 🙂
Separate
I tried a different recipe with a ton of great reviews and after it failed twice I found your recipe and it turned out great and it was so easy! Thank you!!!!
So happy your rolls were a success Amanda! Thanks for the review!
WOW! I never leave comments on recipes, but this one blew me away. I tried a different sub roll recipe yesterday that came out not so great, and decided to give yours a try. These came out amazing – literally better than Subway.
I followed the recipe exactly until the baking portion, where I used a pizza peel to transfer the dough to a pizza steel which had been heating up for about 45 minutes in my oven at 425 (still used a cup of water for steam). I took the rolls out at around 10 minutes to brush with a little more butter and back in for 3-5 minutes.
Excited to make some Italian subs on this bread this week!
thanks so much lauren! try vegetable oil in your other bread recipes and let me know what you think!
Awesome. Thank you so much for the sub recipe! Will use often! Just perfect. Bread flour is a must in my opinion. I used KAF.
잘만들때까지 복습을해서 롤 빵으로 가게를 열것입니다
SO good! Easy. They are so light and soft! Will definitely make again!