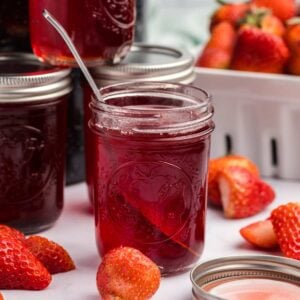
Why would you make strawberry syrup? Umm, because it tastes amazing on pancakes! But you can use it for anything! It’s sweet, versatile, and a simple waterbath canning recipe perfect for beginners.
When it’s late spring and strawberries are everywhere, I like making this after I’m sick of making strawberry jam. My kids love it for breakfast, and I like it in a cocktail 😉.

Ingredients and Tools You’ll Need
Try to use fresh strawberries for this to taste the best. I haven’t tried it with frozen, but if you use frozen, sliced strawberries, thaw them completely first.

Heart’s Content Farmhouse is a participant in the Amazon Services LLC Associates Program, an affiliate advertising program designed to provide a means for sites to earn advertising fees by advertising and linking to Amazon.com. This means that when you click on certain links on this site and make a purchase, I may earn a small commission at no additional cost to you. I only recommend products I genuinely believe in and would use in my own kitchen. As an Amazon Associate, I earn from qualifying purchases.
Equipment
- 4 pint canning jars with lids and bands
- water bath canner
- canning accessories
- fine mesh strainer, essential for making your syrup smooth
Ingredients
- 4 cups fresh strawberries, hulled and halved, use fresh if possible
- 4 cups granulated sugar
- 2 cups water
- 2 tablespoons lemon juice, use bottled for safe acidity levels
How to Make Strawberry Syrup
Step One: Prepare Canning Jars
Prepare the jars by washing them with hot soapy water. Transfer them to a water bath canner and fill the canner with water until the jars are fully submerged in water. Place over medium heat and bring to a simmer. Put the rings and lids in a saucepan with water. Place over medium-low heat and bring to a simmer. Do not boil.

FREE FOR SUBSCRIBERS
Canning Binder
Subscribe (free!) to my newsletter to receive this PDF + dozens of others in my printable library. You’ll also get emails you’ll truly love, with a weekly meal and so much more.

Step Two: Boil The Strawberries And Water
Hull and halve the strawberries. In a large saucepan, combine the strawberries and water. Cook over medium-high heat until the strawberries are soft, about 10 minutes. Mash the strawberries and cook 5 minutes more.

Step Three: Strain The Mixture
Use a fine mesh sieve to strain the strawberry liquid into a bowl, pressing gently on the solids. Discard the solids.

Step Four: Return The Liquid To The Saucepan And Simmer
Add the sugar and lemon juice to the strained liquid. Heat the mixture over medium heat, stirring until the sugar is completely dissolved. Once the sugar is dissolved, bring the syrup to a boil, then reduce the heat and simmer for 5 minutes.

Step Five: Fill Jars With Syrup
Use a ladle and canning funnel to fill the jars with the hot syrup, leaving 1/4 inch headspace.

Step Six: Wipe Jar Rims And Apply Lids
Wipe the rims of the jars with a clean cloth, place the lids on the jars, and screw the bands down until fingertip-tight.

Step Seven: Process
Place the jars in the canning pot and cover them with water. Boil for 10 minutes.

Step Eight: Cool And Check Seals
Remove the lid from the canner and let the jars cool for 5 minutes. Remove jars from water and let cool for 24 hours. Check the seals before storing.

Storage Instructions
Once the jars are cooled and sealed properly, store them in a cool, dry place, like your pantry, for up to a year.
Once they are opened (or if a jar didn’t seal properly), store in the fridge for up to a month.
How to Use Strawberry Syrup
There are SO many ways to use this.
- Drizzle the syrup over fluffy pancakes or crispy waffles.
- Swirl it into regular or Greek yogurt or mix it into your oatmeal.
- Pour over vanilla ice cream, cheesecake, or pound cake.
- Use it as a natural sweetener to make a strawberry cocktail, or create your own cocktail/mocktail with it.
- Blend it into smoothies or milkshakes for extra sweetness and flavor.
- Spread it on toast, croissants, or scones as a fruity alternative to jam.
- Whisk it into vinaigrettes for a sweet salad dressing.
More Ways to Preserve Strawberries
Strawberry season is the best time of year. Here are more ways to preserve your harvest.
- Oven-dried strawberries are easy to make and taste like candy.
- Classic strawberry preserves have bigger pieces of fruit.
- Pickled strawberries don’t require any canning, they’re stored right in the fridge.

Questions and Troubleshooting
You can. They work well when fresh strawberries aren’t in season. I would thaw them first. But if you don’t, just adjust the cooking time slightly as the mixture may take longer to come to a simmer.
Not really. The sugar helps preserve the strawberries safely. If you want low sugar, look for a recipe specifically designed for that.
It just has to simmer for a little longer, allowing more water to evaporate. Remember to stir frequently to prevent burning. The syrup will also thicken slightly as it cools.
Printable Recipe
Strawberry Syrup
Equipment
- 4 Pint canning jars with lids and bands
- fine mesh strainer
Ingredients
- 4 cups fresh strawberries hulled and halved
- 4 cups granulated sugar
- 2 cups water
- 2 tablespoons lemon juice
Save This Recipe
You'll join my email list which you will love. And if you don't, unsubscribe in one click. ❤️
Instructions
- Prepare canning jars. Prepare the jars by washing them with hot soapy water. Transfer them to a water bath canner and fill the canner with water until the jars are fully submerged in water. Place over medium heat and bring to a simmer. Put the rings and lids in a saucepan with water. Place over medium-low heat and bring to a simmer. Do not boil.
- Boil the strawberries and water. Hull and halve the strawberries. In a large saucepan, combine the strawberries and water. Cook over medium-high heat until the strawberries are soft, about 10 minutes. Mash the strawberries and cook 5 minutes more.
- Strain the mixture. Use a fine mesh sieve to strain the strawberry liquid into a bowl, pressing gently on the solids. Discard the solids.
- Return the liquid to the saucepan and simmer. Add the sugar and lemon juice to the strained liquid. Heat the mixture over medium heat, stirring until the sugar is completely dissolved. Once the sugar is dissolved, bring the syrup to a boil, then reduce the heat and simmer for 5 minutes.
- Fill jars with syrup. Use a ladle and canning funnel to fill the jars with the hot syrup, leaving 1/4 inch headspace.
- Wipe jar rims and apply lids. Wipe the rims of the jars with a clean cloth, place the lids on the jars, and screw the bands down until fingertip-tight.
- Process. Place the jars in the canning pot and cover them with water. Boil for 10 minutes.
- Cool and check seals. Remove the lid from the canner and let the jars cool for 5 minutes. Remove jars from water and let cool for 24 hours. Check the seals before storing.
Notes
Nutrition
Did You Make This?
I would love it if you would leave a review!


Great recipe, I had never made strawberry syrup before. made some yesterday turned out really nice, made more today as we had alot of strawberries. I’m sure it’s good on most things , we just tried it on white cake and it was great.
awesome barb! I use on waffles AND if there’s leftover coffee I put it on ice with a some strawberry syrup and a little milk. nice pick me up!